User Tools
biac:experimentalcontrol:headtracker.old
Head Tracking Device
Setting up the Tracking Computer at the Mock Scanner
- Log into Mesmer: the right most keyboard, and the computer screen to the right labeled “Tracking”.
- Open Matlab by going to the Start Menu – All programs – Matlab 7.0.4
- Navigate to the MRI Simulator directory by typing “cd D:\Programs\MRI_Simulator” (without the quotes) in the command window or by navigating using the current directory window
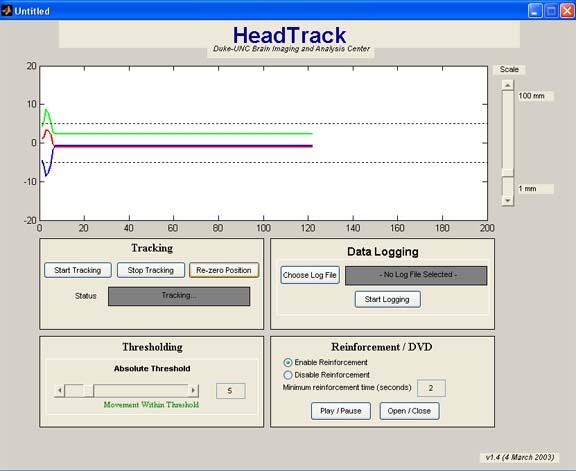
- In the command window type “track” (again, without the quotes). This should launch the head tracking software.
- When you are ready to begin tracking click on the “Start Tracking” button. you should see 3 colored lines (for the X, Y, and Z, dimensions).
- When you would like to stop tracking click on the “Stop Tracking” button.
- Optional Parameters
- If you need to re-zero the tracking lines after a large head movement – click on the “Re-zero Position” button.
- You can adjust the desired spatial range for head tracking (the default is +/- 5mm).
- You can keep a log of the motion by selecting the appropriate option.
- You can Enable Reinforcement (for use with the DVD player, see further instructions below).
- Set up whatever display you would like the subject to see using the keyboard to the left, and the monitor labeled “Stimuli”.
Important! Be sure that the polhemus sensor is inside the scanner bore (either on the subject or moved into the scanner manually for testing) before beginning to track. The program will not work properly if the sensor is outside the bore of the mock scanner.
Setting up the DVD with the Head Tracker at the Mock Scanner
The DVD player can be used in conjunction with the Head Tracking software to enable operant conditioning of the subject. When the subject moves his or her head beyond a specified threshold, the DVD player will pause. The duration of the pause can be controlled both by the software and the individual monitoring the movement. This is ideal for training young subjects on how to be still in the scanner.
- Turn the DVD player that is labeled DVD on.
- Insert the desired DVD into the DVD player labeled DVD.
- On the “ViewSonic” switcher, which rests on top of the DVD players, press the “input” button until the “s-video” display comes up on the monitor in the mock scanner. You should be able to see the DVD playing.
- Set the DVD to the desired segment, and press pause.
- Set up the head tracking software (see full instructions above).
- Optional settings
- You can turn the scanner sounds DVD player on and play the scanner sounds simultaneously with the DVD. This helps simulate the noise of the scanning environment. Please note, that the scanner noise is much louder at the actual scanner.
- Volume for both the DVD and the scanner sounds can be adjusted with the main volume control on each respective DVD player.
- Other notes
- If the subject makes a large movement, you may need to click on the “Re-zero Position” for the lines to reappear in the tracking window.
- If the subject makes a large movement, you may need to click on the “Play/Pause” button to re-start the DVD.
biac/experimentalcontrol/headtracker.old.txt · Last modified: 2023/02/23 18:43 (external edit)


